Friday, 3 February 2017

Afghan Box Cameras: A dying breed.

Researching a lecture on repurposing old cameras and paper negatives I came across some wonderful videos from the Afghan Box Camera Project.  www.afghanboxcamera.com.  This documents the use of thkamra-e-faoree or "instant camera" which was banned for a time by the Taliban (along with music and paper bags) and is now all but extinct thanks to a combination of official demand for colour in identity pictures and the rise of digital. A few survive, some in the hands of artists and experimenters but there are almost no traditional camera operators left in Afghanistan now.


Kamra-e-faoree in use
Every camera is different; made from old packing cases or custom built by local carpenters. They are a combination view camera, copy camera and portable darkroom all in one. Some are as much as 100 years old.  The ingenuity is fantastic: Bits of other cameras and other repurposed materials are incorporated and each has its own features, from special focusing windows to little washing lines complete with pegs to hang drying prints. They all have a display of the photographers' work (and sometimes a few others!) on the side.

The method varies slightly with the design but typically the photographer focuses the image on the ground glass, then working through a lightproof sleeve in the side he positions a small piece of photo paper. This is exposed to make a paper negative, which is developed and fixed inside the camera body, the photographer watching progress through a special eye hole and red filtered window. 
Neg processing inside the camera. A still from the video "How to use an Afghan Box Camera"

Once the neg is fixed, it's repositioned in front of the camera and re-photographed to create a positive print.


Portrait by Muhammad Ishaq
 I trust the project won't mind my putting some of the images from their website here. I urge you to visit it and watch the videos of the camera in use, a carpenter building a new camera, and the process of using coloured kite paper as a source of dye for hand-tinting the prints. The energy and ingenuity are amazing and inspiring.

There is a book of the project by Lukas Birk and Sean Foley:


I've bought my copy!  See the link on the Afghan Box Camera website or go to:

https://www.amazon.co.uk/Afghan-Box-Camera-Lukas-Birk/dp/1907893369/ref=sr_1_1?ie=UTF8&qid=1377087918&sr=8-1&keywords=afghan+box+camera

Links:
The website:
www.afghanboxcamera.com

Great film of the camera in use:
http://www.afghanboxcamera.com/abcp_camera_howtouse.htm

A local carpenter builds a camera:
http://www.afghanboxcamera.com/abcp_camera_howtobuild.htm

Sundry techniques in short videos:
http://www.afghanboxcamera.com/abcp_camera_techniques.htm


Capturing on Collodion: Exhibition in Tunbridge Wells

  I  would assume everyone in this email may be of interest to this, just spotted it.          Best, Lucy


Photographer Sean Hawkey has worked across the world documenting lives and diverse communities. His work as a photojournalist has led him to evaluate the impact of the photograph on the story of people's lives. For this exhibition Hawkey has chosen to work with the Victorian wet plate collodion process to make his images. Using original camera and lens from the 1870s, Hawkey captures portraits of people which have an intense, ethereal beauty to them. The photographic process involves a complex layering of chemicals, including silver nitrate, on a tin plate which is exposed to light through the camera lens and developed, producing a single image. This technique does not produce a perfect image but instead each imperfection on the plate becomes a feature within the portrait, enabling the essence of the sitter to emerge.

Contact Details

Address:
Civic Centre, Mount Pleasant, Royal Tunbridge Wells, TN1 1JN

Phone:
01892 554171


Email:
museum@tunbridgewells.gov.uk

http://www.tunbridgewellsmuseum.org/whats-on/exhibitions/future-exhibition/exhibits/capturing-on-collodion

Thursday, 19 January 2017

Naked Daguerreotype

- Sorry, I couldn't resist the clickbait title!  I've just taken a deep breath and pulled a cased Daguerreotype apart and I thought it was interesting enough to share.   Here's the picture in question. You'll be relieved (or disappointed) to see the subject is fully clothed:
Daguerreotype in original case. Made of wood with a leather cloth covering and a velvet interior. It has protected the delicate image surface well.

Seriously, Daguerreotypes of nudes are rare and highly sought after by collectors. This gentleman is much more typical of the kind of genre portraiture of the 1840s-50s. His head is probably in a brace, which while not actually clamping him in position would probably be uncomfortable or disconcerting, hence his expression. It reminds me of the wonderful scene in Mike Leigh's "Mr Turner" when Timothy Spall as Turner encounters the "Daguerrian Artist" JJE Mayall:

Mr. Tuner (Timothy Spall) poses for a Daguerreotype. The object on the right is a mirror to light his face.

JJE Mayall (Leo Bill) timing the exposure with a pocket watch.
The whole film is terrific but (obviously) I particularly enjoy this scene which shows Turner as interested in the then newfangled process of photography but grumpily sceptical.  This has some basis in fact as Turner did know Mayall, sitting for portraits and discussing photography with him on several occasions.

Anyway, back to my Daguerreotype.  I acquired it with no known provenance so there's no way of knowing who the gentleman is. It was in the usual covered wooden case which had split in the usual way(!) along the hinge. Most of these cases rely on the leathercloth covering forming the hinge between the two halves rather than a metal fitment and they eventually wear out. The condition of the image was very good but the cover glass was filthy and there was a lot of dust and debris on the inside surface as well as the plate itself.

The usual advice to anyone thinking of taking a Daguerreotype apart is "Don't!" They are very delicate and repair or restoration work is best left to a specialist restorer. I'd agree with this if the image is especially valuable such as a portrait of a family member, though any image which has survived for over 150 years should be cherished.  What follows therefore is NOT meant to be a 'how to..' guide to Daguerreotype restoration but just for interest to see how they are put together.

The case is made of wood, covered in a kind of leathercloth (actually a kind of leather-textured paper or fabric) material. The image side has a velvet border which holds the plate, mount and cover glass in place. On this one they weren't fixed in place and very careful levering with a scalpel lifted them out.

The three layers are important. The glass protects the surface from touch, atmospheric pollutants, damp and dirt. The mount keeps the glass from touching the plate and the plate itself is sealed around the edges with paper tape to keep the whole image area in its own little micro-climate. If this is all intact then don't mess with it. In this case the paper tape had entirely disintegrated, with bits falling down onto the image surface. The lack of a seal around the edge meant that dirt and velvet fibres were also free to fall in and obscure and possibly damage the plate. 

After cleaning the glass with warm water (I didn't use a cleaner as solvents can remain and attack the image) and wiping the metal mount it was time to look at the image itself.
A Daguerreotype image is incredibly delicate. If you touch the plate surface it's perfectly possible to wipe the image off completely. It's easy to leave residue from skin etc. or microscopic scratches so however much crud there might be on the surface the advice is don't touch it with anything!  

The Contemporary Daguerreotype artist community website: http://cdags.org  has a whole section on repairs and cleaning if you're actually contemplating it. 

I wouldn't even dare use a canned air blower or my own breath to remove dust: Both can contain moisture or chemicals which deposit on the surface. I used my Giotto "Rocket" air blower as used on digital sensors as it just blows the ambient air around.

Here's the bare plate after dusting. There's a fleck of something on the shoulder which has left a red stain on the plate- possibly the copper coming through (Daguerreotypes are made from a copper plate with a thin electroplated layer of silver on top) but the blower wouldn't shift it. I resisted the urge to poke at it and left it alone.  The rainbow effect is characteristic of this process and as it follows the shape of the mount it's clearly caused by either light or chemical effects (the mount is a gold coloured metal). It looks very beautiful but actually represents deterioration. 

In the copy photograph above the colour is a little exaggerated but it shows that this image was originally hand coloured. There's a little rosiness to the gentleman's cheeks and his hand.  The blue colour of the background might be hand tinting but light areas often acquire a blue tint through a sort of solarisation so it's hard to say. The plate appears to have been hand cut with shears (see the top left corner) and the edges are bevelled slightly. I don't know if this was done with some kind of press or if it's an effect of the polishing process. Bevelled or curved edges would make it easier to polish a small thin plate like this on a buffing wheel with less risk of the eyes catching and distorting the plate.

This is one of the tests of a true Daguerreotype. Seen from an oblique angle the image becomes very silvery and as a negative. The reddish stain on the shoulder shows up well here. Here's a very short video clip showing the effect. 

Note that it's easy to confuse a Daguerreotype with an Ambrotype, and a lot of the ones on Ebay etc. are mis-labelled. Only if it can be viewed as almost mirror-like and as a negative image will it be a genuine Daguerreotype.

Once I was sure the cover glass was completely dry I reassembled everything, re-sealing the edges with archival paper tape. The difficulty with this kind of frame is that the edges are visible so the tape can only be stuck to the edge of the glass and the back of the mount. The velvet holds it all firmly in place at least so no more glues than those in the tape are needed. It's all reversible (the tape can be removed if dampened with water) which is what proper conservators prefer.

A Daguerreotype is a wonderful thing: a crystalline, delicate silvery thing which appears as if painted by fairies more than a mechanical, technical process. I'm fascinated too by the mystery of the sitter: Who was he? Is this the only picture of him ever made?  Where did he live? How? and when? We can never really own these pictures: We are simply custodians for the next generations.


Thursday, 5 January 2017

Carbon Printing: First steps...

In response to a query from Hayden Wilde I've done a bit of research into carbon printing.  This has been described as an "elite" process, and in the early days a portrait in carbon cost more than one in platinum.  Carbon has a very long, 'straight line' response which allows great subtlety and smooth gradation of tones. It's also one of the most archival permanent methods around as carbon (essentially soot particles) doesn't degrade: Think of those prehistoric cave paintings.

The Method:
Carbon is a transfer process.  The light sensitive emulsion is coated onto a support sheet called the "tissue" which is contact printed under UV light.  The tissue is then mated to the final print material and allowed to bond.  The gelatin-based emulsion is then softened in warm water until the tissue backing can be removed and the image 'developed' by rinsing away the soft unexposed areas of the emulsion leaving an image made from microscopic carbon particles.
These gentlemen are variously squeegeeing, developing and finishing carbon prints in this illustration from the Autotype Co. book (see below)

Sounds easy doesn't it?  As soon as you start researching however it quickly becomes a lot more complicated. Most of the 'Alchemy' involves making the tissue: A tricky mixture of carbon black or Indian ink in gelatin, coated onto a substrate which needs to be microporous but not too absorbent, strong but flexible, water resistant but soakable etc. etc. - and that's before you get to coating the stuff!  It's potentially messy; the carbon particles can be as fine as cigarette smoke so weighing the dry powder out is a nightmare apparently. The gelatin-carbon solution is known as the "glop" so you can tell what sort of consistency that has. There's lots online and in manuals on how to make carbon tissue, and like so much of the Alt. process world it's full of conflicting advice with everyone (it seems) insisting their method is the Only True Way.

Carbon tissue used to be widely available commercially. The Autotype company was founded in 1868 by Sir Joseph Swan (co-inventor of the light bulb) and it flourished for decades selling a wide variety of different types and colours of carbon tissue for photographic use.

The company still exists. These days it makes specialist film products for the graphic arts industry and computer and 'phone screen coatings. - but sadly no carbon tissue.

Bostick and Sullivan
US readers will be familiar with the company of Dick Bostick and Melody Sullivan.  For years they have been supplying photographic and alternative processing materials, in roughly the same way as Silverprint in the UK. One of their long-term projects has been to re-manufacture carbon tissue commercially and they now sell it through their website: https://www.bostick-sullivan.com
It's available in three colours, black, brown and green.
The only downside is that the shipping costs to the UK are VERY high: - It cost me around £160 in total to get two pieces of tissue sent. It's only supplied in rolls 3 feet wide x 4 feet long and while that makes the use of the tissue economic it does push up the shipping costs!  We shall have to see if we can do anything about this..

First tests with B+S tissue.
The B+S carbon tissue is an excellent product. A beautifully consistent coating on a (reasonably) well behaved backing. It does curl a bit when wet but not excessively. It's not light sensitive as supplied which means it's easier to handle and trim to size in the daylight. You only use pieces the same size as your negative and I found it simplest to cut a set of sheets to exact size before sensitising. any offcuts can be used for test strips.

Sensitising.
To make the tissue light sensitive it needs to be coated in a weak solution of potassium dichromate.  Dichromates are nasty things: Hazardous to health and not good for the environment. The actual solution isn't excessively dangerous as it's only used in concentrations of 0.5% to about 4% max but the raw chemical should be handled with great care, particularly to avoid breathing the dust or getting it on the skin. Once mixed (in a solution of distilled water and isopropyl alcohol) it should still be handled with gloves. Goggles are a good precaution too.
The dichromate is brushed onto the tissue surface with a foam brush and then left to dry in a dark box. Once dry it needs to be used within a day or two as it goes 'off'. though you can apparently freeze it to preserve it.

Exposure.
The tissue needs UV light to expose it so I used my light box. It's quite slow: I found I needed exposures of between 2 and 16 minutes with most negatives. Camera negs tend to be rather too 'flat' for the process so digital negs are really the best way to go. Contrast can be adjusted by altering the dichromate strength but it's not a big range.

Mating the tissue to the support.
The carbon image is only carried by the tissue. It needs to be transferred to the final paper support. While it is possible to coat almost anything (watercolour papers are popular and carbon on opal glass pictures were made around the 1900s) the can be tricky so I followed recommendations and used fixed out photo paper. This is ordinary black and white enlarging paper which has been fixed, washed and dried to remove the silver and leave a suitable gelatin coated paper.  Inkjet materials are also recommended as their microporous surfaces are designed to hold the ink. The gelatin carbon emulsion sticks equally well.
The mating process is easy: a quick dip of both tissue and support in cold water, a brush to remove bubbles and then the two are placed face to face, removed and pressed together with a rubber squeegee.

The squeegeeing removes the excess liquid from between the surfaces and generally that's all that's needed to hold them together. If they curl, put a sheet of glass on top. The mated pieces are left for at least 15 minutes (some recommend much longer) to bond.

Development.
No chemicals are needed, just water at around 38 degrees C to soften the gelatin. The print is placed in a big tray of warm water and allowed to soak there for at least 5 minutes. After that, the tissue (top piece here) can be gently peeled away.


The carbon emulsion is soft and soluble in the highlights and harder in the shadows where it's received more light. Development consists of rinsing away the soft unexposed areas to reveal the image. Above you can see the pigment flowing off the surface in the bottom corner.
As the emulsion is not light sensitive when wet, development can be carried out in normal light. Keep gently agitating the print under the warm water and the image will appear:

Above you can see the image starting to appear. The carbon particles look like ink in water.

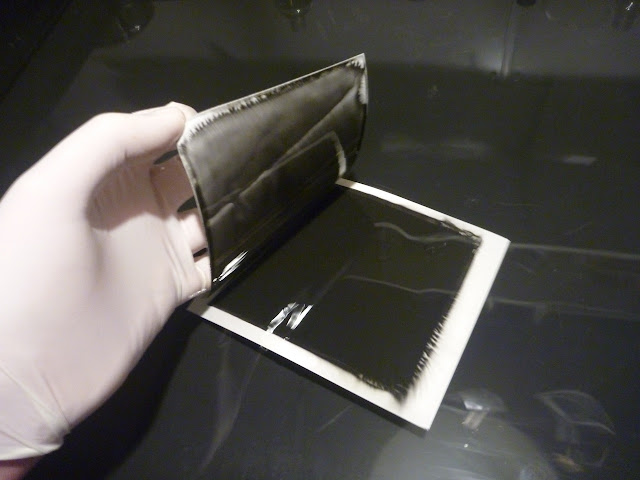
Development is complete when no more black runs off the surface. The image is very fragile at this stage: You can see it's started to peel off at the bottom. Putting a dark border around the neg helps avoid this as there's then a hard black-white edge which dissolves less.

Once developed the print should be rinsed in cold water to harden the gelatin and dried. Once dry the image surface is more robust and if using glossy papers you can often see a texture. The dark parts are physically thicker than the light parts and this is visible, even when the print is dry.

Conclusion
If you use ready-made carbon tissue the process is not too messy or difficult to do. Inkjet or fixed-out photo papers are recommended for initial trials as the emulsion (mostly!) stuck well to these. Other materials may need 'sizing': - coating with other substances to encourage the gelatin to stick properly. I've used the Silverprint Alum/gelatin subbing solution for other things in the past: This might be worth a try?
The biggest thing is negative contrast: To get prints which do the process justice the negative has to have a density/exposure curve which corresponds to the carbon emulsion. This is quite long and with little or no appreciable 'toe' or 'shoulder' as far as I can see. I made some tests with some test negs supplied by Beytan Erkmen as they had more overall contrast than my camera negs, but they still had problems with local contrast. I'll do some more research into suitable neg curves and see what might work.

EXPERIMENTING SESSION
(I won't call it a workshop as I won't really be teaching stuff). - I shall do a session in UCA Farnham soon (January 2017 I hope) when we can have more of a chance to experiment together.  I have a few health & safety hoops to jump through first but as soon as we've done all the necessary risk assessment stuff and found a suitable day I'll let you know.   
Note that this is a Alt. Process User's Group session and not a taught UCA one so it's open only to members/authors on this site.  If you're interested in coming along, email me! 

Sunday, 18 December 2016

Happy Christmas!

A very Happy Christmas to everyone on the Alternative and Historic Process User's Group!


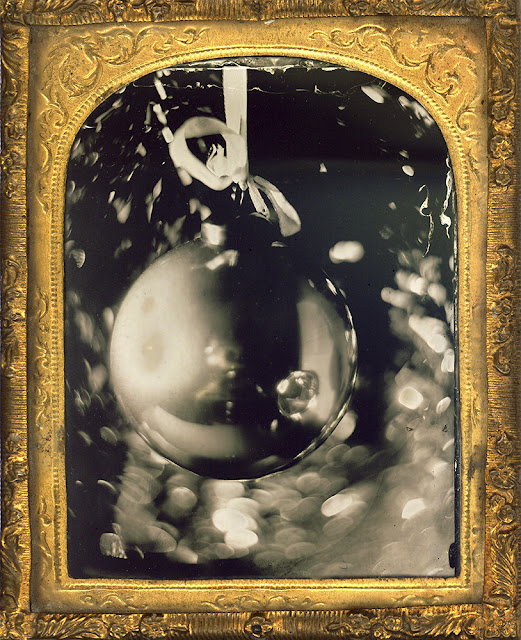
Technical  notes: The image is a quarter-plate tintype (collodion on black trophy aluminium) which I set up specially. The hardest part was getting a reflection of the camera in the bauble: I had a hard time finding a good, truly mirror-reflective one. The exposure was 4 minutes (240 seconds) at f/4. - A combination of macro focus distance and low-power spot lights gave me little alternative!  The frame is scanned from a ninth-plate Daguerreotype in my collection (more about that another time)
It was interesting to do but hard work!  

 I hope you enjoy it and I look forward to more historic and alternative work next year.
Peter.

Sunday, 16 October 2016

A Mousetrap camera.


When conducting his early experiments, William Henry Fox Talbot used a number of very simple cameras,  little wooden boxes which he positioned around his home, causing his wife to nickname them his “mousetraps”. 
Talbot started by using the lenses he had to hand -generally from microscope optics. These typically have tiny coverage and short focal lengths, hence the small boxes. 
This one was made as an experiment after I was given a tiny lens, possibly from a microscope or something similar.. The focal length is about 33mm and the maximum aperture is approx. 16mm  which equates to f/2. 
The "Nipper" mousetrap camera. about 3 inches (8cm) high.

A basic box was made up from plywood with the lens simply screwed into a hole in the wood. The back is hinged with a hook catch to hold it shut.  More pieces of plywood inside make a frame to hold the plate / film / paper in the right position for an infinity focus. Such tiny lenses are hard to focus accurately but by trial and error with a piece of ground glass and a magnifier the frame was sanded down until it was the right depth. Closer distances could be focussed by the addition of card spacers.  
Loading in the darkroom. The paper neg here is a little under 60mm x 70mm.
Made for experiments with early processes such as Talbot’s salted paper Calotype it’s about as simple as a camera can be and makes a very beautiful image on tiny plates. The whole camera is about 3 inches (8cm) high.  It has a tripod bush but no shutter or viewfinder and no removable plate holder. The camera is loaded and unloaded in the darkroom for each shot.

Here are some preliminary tests using little bits of resin coated print paper:

Like Niépce (and because it was raining) I started with the view from my window. You can see the reflection of the tripod. 
Note how the centre of the image is reasonably sharp but  the distortion rapidly increases towards the edges. All lenses do this, but mostly the camera just uses the 'sweet spot' in the middle. I deliberately made this oversize to explore the effects.

Liss Mill. Opposite my house it's a handy test subject.
Without a viewfinder, aiming the camera is a bit hit and miss. I could set it up with ground glass in place but then I'd need to return the camera to the darkroom for loading. A quick release tripod plate would be a solution. A better one would be to have made the camera take film holders ('dark slides') but I wanted to keep things simple, primitive and true to the Fox Talbot original.

The lens covers a very wide angle but as only the centre is sharp framing is more critical than you'd expect. In this picture the building is reasonably sharp (you can count the bricks in the central area) because it was well centred..
.


... This time however it's framed a little closer to the top and the resulting distortion is quite dramatic!  I don't see this kind of thing as a defect of the lens, more revealing aspects of its character.

Another aspect I hadn't worried about was the speed of the lens. At f/2 it will be good for very slow materials like salted paper calotypes but if anything it's a bit too bright for paper negs. 
Exposure times on a dull rainy day were around 1/8th second or so. I was using a Sinar shutter on these tests for accuracy but I want to use just a lens cap to control the exposure. a much smaller aperture, say f/32 would mean long exposures of several seconds or more. - easy to control without a mechanical shutter. I need to make a 'Waterhouse Stop': a piece of thin metal with an aperture hole cut in it. As the f/ stop number is a fraction of the focal length, f/32 for this lens will be about 1mm in diameter.  I'll get lots of depth of field but probably not much reduction in the distortion. We shall see..Finally, as the weather deteriorated and I decided to pack up for the day I noticed the panels of the back door. This is just opposite the darkroom and I've passed it hundreds of times. Today though, with early pioneer photography on my mind I noticed it bore a slight resemblance to Talbot's famous Latticed Window. Time for a little homage...


My back door. Almost entirely unlike:
...Talbot's Latticed Window at Lacock, 1835.

I made the camera as the first step in experimenting with things like Calotypes and other very simple in-camera processes. I've learned a few things which will go into future projects and I've felt about 8 years old, enjoying the excitement of it all. Lenses are miraculous things!

[Finally if you're wondering why the mousetrap camera is named "the Nipper" ask your grandparents! :-)

Wednesday, 31 August 2016

Cyanotypes at Andinet in Ethiopia.

During a three week trip to Ethiopia this summer where I was teaching and decorating at Andinet School in Azezo I got the chance to make Cyanotypes with a group of 26 children from grades 1-3. With ages ranging from 6-25 and very basic english from most of them it was a challenge to get going but once they were able to see the process happening everything seemed to click. The paper I had pre-prepared at home in sheets of 6x4 and once there I got them to take it in turns of groups of two. I first got the children to explore the local fauna and flora of the school to find a suitable leaf or flower to use. A very basic set up perched on the edge of our classroom outside we were lucky to have such a bright sunshine on this particular day during their monsoon season. These are two test cyanotypes I made myself before starting with the children.


By the end of the session I feel as though the children; particularly those older were really starting to grasp the process and the importance of the sun within it, the whole morning was a complete success with compliments from the school director and an audience watching when we finished. Lots of smiley faces, dropped jaws and beautiful Prussian blue prints!


-Lucy J.

Monday, 22 August 2016

Wet Plate Party

[My apologies to those who would be forgiven for thinking this blog is becoming "The Wet-Plate Weekly". - other processes are available and will be written up soon- I promise!- P ]

Quite a few people have shown an interest in the wet collodion sessions I've run at UCA and a staff day is (still) promised. I thought it would be fun to have a bit of a party for some of the people on this blog group and others, mainly to socialise but also to provide me with some subjects. I also want to do a series of portraits of photographers and this seemed a good place to start.
As it turned out the weather wasn't special so the planned barbecue was off and we worked inside, using the (highly variable!) light from the French windows. We used my Watson whole plate camera and an interesting lens: an Aldis Epidiascope (projector) lens of 35cm and f/4. It covers whole plates easily with no obvious distortion (I've done quite a lot of swirly bokeh stuff recently and wanted a change) and it's a nice portrait lens: softish and low in contrast. It worked well with the available light, though some aperture control would be an improvement. I'll cut a slot in the barrel and make some Waterhouse stops for it when I have time.

Here's a test shot of Annie (Sorry Annie, we should have gone back and done another proper one of you). Marred by some dodgy glass-cleaning on my part. - At least that's what I think the problem was: A big section peeled off while the plate was drying. I had a new micro-fibre cloth I was using to clean the plates with and I'm wondering if that left some kind of residue. It may just have been carelessness on my part.


This one is my favourite: Martin Pover looking very distinguished - and possibly just a tiny bit like David Bowie? - a very 19th-century feel to the light and the lens quality. Just daylight and a small reflector to fill in the shadows. The exposure time was around 20 seconds at f/4 with bright but cloudy weather outside. (this equates to around ISO 0.2)


Next we had the undoubted star of the day.  Ruby is Annie Mitchell's daughter and the assembled photographers all agreed she looked just right for a Julia Margaret Cameron cherub!  One wild flower headband later she was ready to pose, sitting wonderfully still for 30 seconds. - Her eyes have moved a bit but to be fair we didn't tell her to stare at a single spot. Thank you, Ruby for being such a great model.

Below:  Annie and Ruby together. This was harder to keep still, despite Debra's 'watch the birdie' skills: She played cartoons on her 'phone to keep Ruby's attention in the same spot. I think I over-developed the plate a little I'm afraid.


Above:  Silke Dettmers. I shouldn't keep apologising for the technical defects I know, but I wish I'd have done a better exposure and poured the developer more evenly. I think I'm going to sit and practice with a dummy plate until I can do a perfect (or at least adequate) pour. The ideal is just enough liquid to cover the surface, spread evenly and swiftly and then kept on the plate, not dripping off the edges for the 15 seconds or so it takes to develop.

Lastly, Debra-Lorraine was good enough to bring her camera with her as requested. The idea of photographing fellow photographers with their cameras got a bit lost during all the excitement but the day was primarily for fun which I think we all had. I was impressed by Debra's keenness to pour plates. - most people are a bit reticent because it looks difficult. Several of the plates here were prepared by her.

Thanks to everyone who came. Special thanks to my lovely Catherine for feeding and watering us all and apologies to Algernon for his having to spend the day shut out from proceedings.
I'm delighted that everyone seems to have enjoyed themselves as much as I did. We must do this again!

                                                                                                                                             Peter.

Thursday, 18 August 2016

Selfie stick? - no, that's a Black & Decker Workmate.

As Large As Life.


Some people will be familiar  with "The Behemoth" - my home-built 20"x24" mammoth plate camera which I've demonstrated at a few workshops. The current spell of good weather has meant I've finally had the time and conditions to have a bit more of a play with it.
The lens is a 21" (533mm) f/10 Taylor Hobson Cooke from a process camera with enormous coverage. The bellows extend to about 32 inches (812mm) which allows a good range of focus but this means it won't focus closer than about 60 inches (1.5m). This is close enough for most things, especially at this scale but it would be interesting to be able to photograph things at life-size.

A bit of calculating (the principal lens formula: 1/V+1/U = 1/f is so useful in camera building!) shows that for a 21 inch lens I needed a bellows length (U) of 42 inches. - Actually for 1:1 magnification it's easy- just double the focal length).  As the bellows wouldn't stretch further I built the Behemoth Close-Up Accessory - a 10 inch deep wooden box which clips to the back of the camera to extend it.

So to test it: The idea was always to make life-size head and shoulders portraits so I started with a self -portrait. - Always one to make things as difficult as possible for myself!
The depth of focus is tiny at f/10: - maybe an inch at best. I used by head clamp/rest to make my position the same every time and set up a rod on a stand with a paper flag as close to where my eye would be as I could. Focusing on this was just about possible.

The full set up:B&D Workmate bench is better than a tripod...
I used ordinary R/C enlarging paper as the sensitive material. This is around ISO 3 so I set up outside in open shade where there was a decent amount of light. The camera isn't very heavy -at least for its size(!) and will sit on a tripod. However, for this I used a Black & Decker 'Workmate' bench. The advantage is that the camera can be slid back and forth a few inches on the bench and locked in place much more quickly and easily than with a tripod.  With close up work like this it's a lot easier to set the focus and move the camera.
The two plate cameras behind me are just to make an interesting background. The round mirror by my feet is adding a bit of reflected highlight into my eyes. The two sticks to my right are my focusing target and to operate the card flap over the lens I used as a shutter. (This idea I got from Sally Mann: It works beautifully!)  Also visible is the metronome used for timing the exposures. 45 seconds at f/32 was the final exposure.

Here's my final picture for the day: I can't say it's particularly great: The chair I used made me 'slump' too far back and the camera should have been lower. My grumpy expression is mainly due to trying to keep still and with my eyes open for a long time on a bright day. Anyhow, it was meant as a test of technique and feasibility more than a piece of artistic expression.
Life-size self portrait. PR. August 2016
The paper negs were processed in the darkroom and then re-photographed and tonally inverted digitally. - I haven't had time to go back and contact print them yet. I'm therefore guessing a bit what constitutes a good paper neg: I just worked on getting detail in both ends of the scale (it's a fixed-grade 2). More on this when I've done some more work on it..

Thursday, 23 June 2016

The Story of an Albumen Print


I found this print in a charity shop recently. It was sealed in a clear bag and under a mount but it was obviously a real photograph and not a reproduction, looking very much like an albumen print. At £2 it wasn’t a difficult decision to buy it  (This is why my house is packed full of old stuff!)

Luckily this print had been mounted by a framer who knew a bit about old prints. It wasn’t dry mounted or glued to the mount but just held in place with a couple of acid-free paper hinges. The mount hinged open so it could easily be removed without damage. Ideal.
When originally made, the print had been pasted to a piece of thin card. This is quite common as the paper used is very thin and fragile.  Albumen prints are made by coating fine drawing paper in albumen (egg white) before sensitising with sliver nitrate. The prints have a slight satin sheen to them, subtle tonal gradation and very fine detail. The highlights are frequently yellowed, as the egg proteins break down over time.


The faint pencilled caption says “Palais de Tuileries” but no more information. Time for some research…
The palace no longer exists. It used to stand at the western end of the Louvre courtyard- the side now open to the Tuileries garden. It was completed in the 1860s but burned down in the Paris Commune riots of 1871.
This photograph  must therefore have  been made between 1860 or so and 1871. The albumen print would have been made from a collodion negative as the ‘collodion period’ runs from 1851 to about 1874 (“dry plates” were invented in 1871 and most photographers abandoned collodion within a few years)


A Google image search quickly yields some identical pictures. Even if this was a well-used viewpoint the pattern of the open and closed windows and blinds wouldn’t be the same. There are prints in the collections of the Musee McCord, The Biblioteque Nationale and the Metropolitan Museum of Art. These fine bodies list their collections online and all list the photographer as Achille Quinet…


Sarah Kennel in the Encyclopaedia of 19th Century Photography has this to say about Quinet:
Achille Léon Quinet (1831–1900)… was a successful photographer who operated a studio at 320 rue St Honoré, Paris from about 1869 to 1879. Although Quinet made photographs of the moments and architecture of Paris as well as a series of views of Italy, he is best known for his landscape… Most of Quinet’s work is housed at the Bibliothèque Nationale, Paris, where he deposited his Etudes at the Depôt Légal in 1868, 1875, and 1877.
So..
It would appear that what I have here is a photograph from about 1865-1871 (so around 150 years old) and made by a kind of precursor to one of my heroes: Eugene Atget. Quinet, like Atget made photographs of architectural features of Paris as well as “documents for artists”, and (unknowingly in this case) recorded a part of Paris which would soon be destroyed. The picture is technically very well made, but not as lyrical as Atget would have made it. It’s more of a record than an artwork.
The detail is very fine. This is almost certainly a contact print from a negative of around 8 x 10 inches. With a magnifier it’s possible to read the numbers on the clock, which has only one hand…


.. hang on.. This is a collodion image made on a hazy day. The lens would have been stopped down for best sharpness (and a slower “rectilinear” type for architecture) so the exposure time was probably several minutes.  That’s why there’s no minute hand on the clock: It moved during the exposure and was too blurred to register.
[I recently found another example in a photograph by Julia Margaret Cameron. Taken over a couple of minutes just before midday it seems: ]
detail from Julia Margaret Cameron image. See the blurred but visible minute hand.

One last little gem: The back of the print has a little pencil drawing on it. - I’ve no clues as to who this woman might be so she will have to remain a mystery. - like how this piece of 150 year old French photography ended up in a charity shop in Hampshire. 
I treasure things like this, and I love living in a world where it’s easy to find the additional information which gives them a life and a story.
Who was this? Why was this drawing on the back of the print? This part will remain a mystery...


UPDATE: September 2017:
Never say never!  - I've just bought a cartes de visite album with a good number of 'celebrity' cartes in it, mainly European royalty. In among them is this one: "Eugenie, Empress of France, wife of Napoleon III"
The carte is reversed (I've flipped it back here for comparison) so maybe the image was traced from a similar print but it's definitely the same picture, so we do know who she was after all.  Blimey! - I'm becoming a proper collector...
... or not.  Mystery solved. Carte de Visite of Eugenie, Empress of France.