Monday 19 November 2018

Meeting of the Mammoths: Photographing the Polaroid 20x24"

In the mid 1970s. the Polaroid company produced a handful of special experimental cameras. Using super-wide wide film they produced instant pictures in a true 'Mammoth Plate' size of 20 x 24 inches.
A rare beastie: This is Polaroid 20x24 camera No. 5.

Trying to pin down the exact history is tricky but the general consensus is that five or six cameras were originally made in around 1976. They were lent or leased to a variety of people to help promote Polaroid's latest instant film technology.  Not all the original cameras are still in use, but a few more were made by Wisner and others later. Anyway, these days a 20x24 Polaroid is one of the rarest cameras in existence.

20x24 Studio Berlin are a group of photographers using an original Polaroid 20x24.  Last week I was lucky enough to be invited to join them on a shoot at a large private car museum. The curator knows my interest in unusual cameras. He'd forgotten that I own a 20x24" too!  Although mine is not an instant camera, two 'Mammoth Plate cameras together was too good an opportunity to miss, so I brought my "Behemoth" with me.

The camera is a strange mixture of Hi-tech and DIY engineering. The camera frame is very solidly made with some beautifully machined parts for the focus and lens movements, and some clever and complex mechanical linkages for powering the rollers and inserting the chemical pods. Other parts seem strangely home-made. Every camera is different and they all have had modifications and repairs over the last four decades.
Level and tilt indicators

These curious square knobs and the wood veneer are very 1970s 
While we're being really nerdy:  the lens is a Fuji 600mm f/11 in a Copal 3 shutter. Here a light magenta filter is being used to counteract a greenish tinge to the film.

Bespoke handles for raising the level contrast with the socket set ratchet for angle control.  This is an updated version of a traditional Victorian studio stand.
The brass knob activates the pod advance- drop mechanism. The square buttons control the roller motor and the round thing is a speaker - it beeps as it disgorges the film.   I'm not sure what the digits are for. They don't do anything on this camera now.

Focusing the camera: the focus cloth is double duvet sized!
Ready to shoot:  The back is closed, the neg pulled downed the shutter is cocked.
Unlike almost all other instant films, the material comes on long rolls. The black-backed negative part  comes on a roll about 50 metres long by 500mm (20") wide: Enough for about 45 pictures.  The print paper is the same width but shorter rolls as it is thicker. They can be changed independently.
Inside the camera back: white paper roll at the bottom, black negative roll at the top. Note the string for pulling the neg down like a blind.

The chemistry is contained in 'pods': triple sachets which are introduced between the neg and print before being squeezed out to spread the processing gel evenly over the surface. Once the image is composed and focused the focus screen is removed from the back and the door is shut.
The shooting sequence is:
The neg is pulled down like a blind inside the camera using a piece of string taped to the bottom edge. A small amount is allowed to protrude through a light trap at the base.
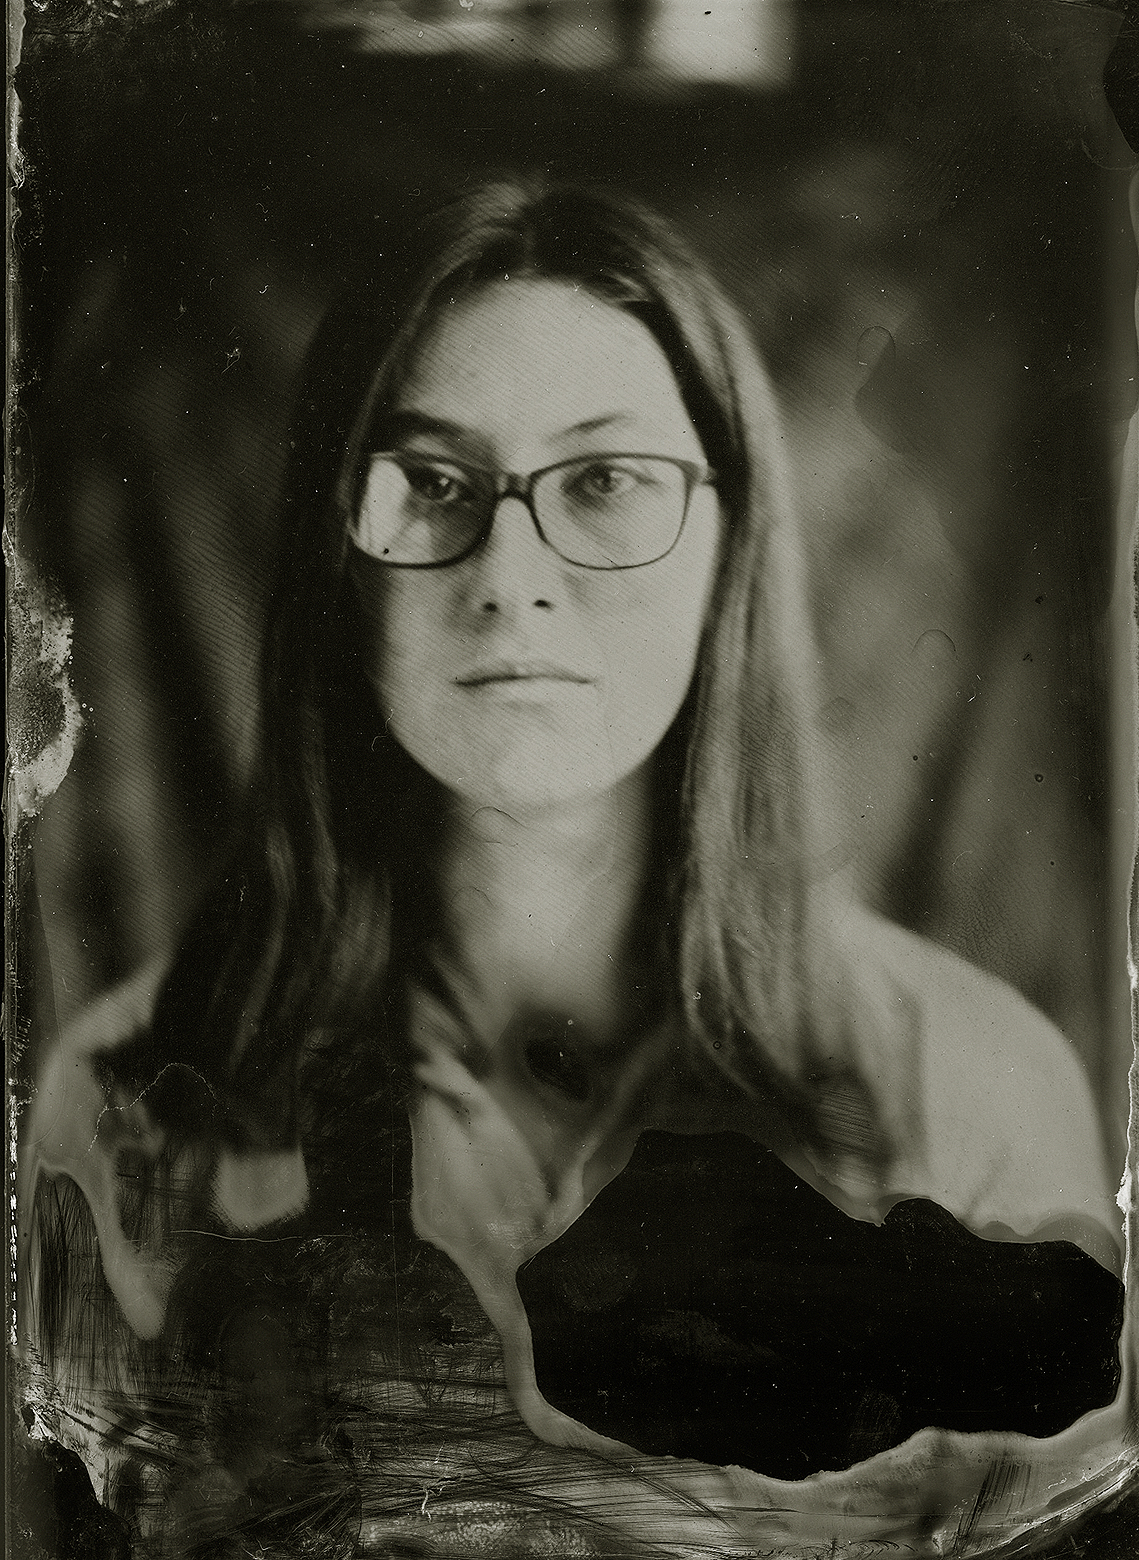
The exposure is made. The film speed is around ISO 32 depending on the light source being used.
A pair of film pods are dropped between the neg and paper using a complex remote control mechanism. (Ollie the photographer puts his head against the camera to listen for the sound of the pods dropping home to ensure they are in place).  A quirk of the camera is that it needs to be properly vertical for this, tilting the camera from angled to upright every time (hence the angle gauges) and landscape format also isn't really an option.
A motor drives the rollers which extrude the paper, neg and chemistry together evenly. The rollers must be perfectly aligned and regularly checked with feeler gauges. Pairs of small pods work better than larger single ones apparently.
Once extruded, the edges are wiped (Polaroid chemical gel is horrible caustic stuff!) and the film/paper cut off the roll with a knife.
Ollie wipes the excess chemicals off the edges of the film.
After about 70 seconds the neg is peeled away to reveal the print.
Peeling off the negative layer.  The prints are taped down to stop them curling up as they dry.
The guys from 20x24 studio were on a tight schedule, wheeling cars onto the black fabric background, shooting one or two pictures of each then wheeling them off again.  I didn't want to get in their way but equally I  really wanted to make a portrait of a fellow 20x24" photographer made with another 20x24" camera so I set up the Behemoth to one side and waited for an opportunity between shots to photograph Ollie and Markus:

My (paper) negs were around ISO 3 and the museum was very dark. I borrowed some of Ollie's lights but we still needed around a 60 second exposure and 16 flashes from twin 2K Elinchroms!  The guys did a great job of staying immobile and staring into the lights.
Markus and Oliver of 20x24 Studio Berlin.  November 2018.
Thanks to all the guys from 20x24  Studio Berlin for being so generous with their time and to Rob for introducing us so we could share our love of photography, film and absurdly large cameras.

It was great to have two mammoth cameras together. At the end of the day I pointed out mine has a shoulder strap (it is just about useable) "Ah!" said Ollie, "Back in Berlin we have a selfie stick for ours!"...

Links:

20x24 Studio New York:  https://20x24studio.com
Lots here on the history and operational details of the cameras, plus sample images, video clips etc.

20x24 Studio Berlin:  http://20x24-studio-berlin.com

Elsa Dorfman: http://www.elsadorfman.com
Elsa Dorfman has been making portraits on Polaroid 20x24 for longer than anyone else.

Chuck Close: https://uk.phaidon.com/agenda/photography/articles/2014/february/06/have-you-seen-the-size-of-chuck-close-s-camera/
Chuck Close has made some very interesting work with a variety of photo processes. This links to his Polaroid work for Vanity Fair.

William Wegman: https://wegmanworld.typepad.com/wegman_world/process/
William Wegman's blog article looking back at the work he made on the 20x24"

Monday 15 October 2018

Flowers and Photograms: UCA collodion October 2018


Yes, another UCA collodion session. This one was carried over from last term as many people were busy with work placements, so we rescheduled it for October. Luckily we had a good sunny day. Even though we worked indoors we need that UV light.

I've not got a lot of new technical insights this time as our working practices on these sessions are getting more standardised. Using Lea's Landscape no. 7 collodion from Wet Plate Supplies and the beautiful fast 12" f/3.5 Taylor Hobson Cooke Portrait lens meant exposure times were short: around 4 seconds in the morning.
The pours were consistently very good: partly operator skill (well done everybody) and partly the collodion which seems to keep and flow better than the JB stuff we used to use. It does seem more susceptible to spotting from finger heat (there are various conflicting theories why the image darkens in patches above where the fingers supported the plate during pouring. whatever the reason, something definitely happens!) I'll try and do some tests sometime.

If anything we might have been over-exposing a bit. The images 'came up' a bit fast in development and there's a bit of excess silver here and there. Maybe my judgement was off; I've been busy with the new studio this summer and hadn't made a plate in quite a while. They do scan (and should print in the darkroom) well.

Here's the sequence for the first test:
Our usual setup in the corner of the finishing room. Note the marks on the dark slide for test strip exposures at different plate sizes. (thanks to Daryl Pallas for these colour photos)
The image as seen on the ground glass. It almost makes me wish we could do colour! (it does look a lot like an early autochrome...
Pouring the plate...
... starting to fix...
... and fully fixed.  Note how the image has changed from a milky negative to a positive.
Alana sat in the 'hot seat' supposedly just for an exposure test but we ended up making a proper plate as the flowers she brought looked so good.

After my original demo, everyone poured their own plates.
Daryl wearing the focusing cloth. The floral side often gets used as a prop...

Harriet's plate was less successful. A bit of motion blur, some marks and quite a big area of emulsion lifting around the "island" on the right meant we had a second go:
Much better! Everyone was getting into things like background tone by this point.

Naomi's plate is just lovely.  Natural window light and a single fill-in reflector is all we used all day.

Rory working both the floral headdress and the focus cloth for a terrific pagan "Green Man" look.

Alana wanted to try something different: A photogram contact print. This is tricky as you can't really let anything touch the wet collodion emulsion as it's extremely soft and sticky. The solution was to invert the plate (emulsion down), supporting it just at the corners and place the plants on the dry back side. Exposure time under the 5x4 enlarger was around 30 seconds for a half-plate. It works both as a positive and a negative so here are both versions.

Naomi's second plate. All the images we made were half-plates, made on my Chapman 12x15 camera with the Cooke 12" portrait lens.

Except...
Hayden's acquired an exquisite little quarter-plate Watson "hand & stand" camera, complete with plate holders. We had to try it, so we made a couple of tintypes. 
hmmm... Watson 1/4 plate meets Chapman 12"x15"
The view from the sitter's chair. The Watson's less intimidating than the big Chapman

I haven't got the plates Hayden made on the little Watson (they were great!) but if we can, I'll add scans here.  In the meantime, well done everyone for making an inspired, original and beautiful series of portraits!  I demonstrate the techniques and do the donkey work of sensitising and developing the plates but the images; how they look and feel is down to the skill and inspiration of the people in the workshop.

Peter.

Tuesday 17 July 2018

The £3 infra-red camera: (a DIGITAL article - shock!)

-Yes, but I'd argue iit qualifies as an "alternative" process as it really messes with the pixies in an experimental way and not simply in post-production.

This is something I’d wanted to try for ages - hacking a digital camera to make it sensitive to infrared light. There are various tutorials online and the results look promising.

Hacking a digital camera is easy -in theory..

The basic procedure for making an IR digital camera is simple: remove the filter which covers the sensor. The difficulty is getting at it without messing up the delicate (some might say flimsy!) stuff inside the camera.  Typically they are full of small circuit boards, connected by ribbon cables, ultra-thin wires and snap-together plastic doodads, all folded and wrapped around each other in ways hard to follow and easy to damage.  As this is unlikely to be a reversible procedure I did what others recommend: Start on a cheap compact camera from a charity shop, so it’s not a big deal if you wreck it. (Access is potentially easier on DSLRs but you’ve got to be brave or very wealthy to do one of them)
Poor innocent Canon compact on the operating table...

So here's my victim; £3 worth of Canon Powershot A570. 7.1 blazing megapixels and a ton of features. Very nice if you like that sort of thing.  Having checked it works OK it’s time to delve inside.
I won’t make this a ‘how-to..’ guide as every camera will be different but here are some general points, and things I learned along the way:

1. Look at YouTube or Instructables etc. for instructions on how to take your model of camera apart. It can save a lot of time looking for hidden screws or stop you breaking something by accident.

2. The flash runs off a VERY HIGH VOLTAGE capacitor which stores a charge even when the camera is switched off.  This can give you a very painful shock or even burn you so discharge it before you begin:
Before you start, set the flash to ON, take a picture, and instantly open the battery compartment. This stops the flash from recharging and makes the camera safer.   As an added safety precaution leave the camera with the batteries removed for a day or two before dismantling to allow any stored charge to dissipate.

3. Dismantle the camera, taking care to store the tiny screws logically in sets and take lots of photos as you go. Trust me: - you won’t remember where every wire, tab, flange or clip fits when it’s time to put it all back!
this is about halfway through the strip-down. These things are complicated!

4. Take great care. Don’t pull, bend or force anything. These things are really not designed to be taken apart.  If at all possible don’t pull any ribbon cables off connectors, even if they appear to have re-connectable  plugs. In my experience they don’t like it!  Try to disturb as little as possible  as you gain access to the sensor. On this one I reached it from the back of the lens turret but I had to move the screen and three circuit boards out of the way just to get access to the screws holding it in.

This is what you’re looking for: The sensor and the infrared filter which covers it. Carefully remove the filter glass, leaving any spacers or gaskets in place. The sensor needs to go back in exactly the same position.  If it’s out by even the thickness of a gasket the camera won’t focus properly. Don’t touch the sensor but gently blow any dust off it before reassembly.


Here’s the filter. Only a tiny piece of glass but it blocks the infrared wavelengths from the sensor and ensures the camera has a ‘natural’ colour response. 

Reassembly is the reverse of removal (as it says in all the best manuals) - but it’s time-consuming and fiddly. Take as much care as you did when dismantling things and ensure everything is seated properly before tightening the screws, otherwise you can easily crack a component and ruin the whole camera. Once you’ve got it all back together without too many screws left over :-) reinstall the card and batteries and try it.
Test shot with the camera reassembled
This hideous colour is a sign of success. The sensor is now seeing all wavelengths including the infra-red which the filter was blocking. This Canon allows a custom white balance but simply trying the various options (daylight, tungsten, flash etc.) goes through a good range of options. Choosing the setting where the colour looks most normal gives more scope and gradation in post production.

The image is bit over-exposed but that can be compensated. Converting to black and white in Photoshop and biasing the conversion to the reds a bit gives a good, strong infra-red effect.

Here's the same scene shot in different ways:
'Straight' digital photograph with no infrared (actually shot on my iPhone as the Canon can no longer do this)

No filter on the lens but "custom' white balance selected on camera. The mildest effect but still a long way from 'natural' colours.
A strong red (Kodak no.29) filter gives some very odd colours - the foreground grass and foliage are almost normal green but with a white tree and orange sky

Using a dedicated IR filter (Ilford's SFX filter) gives near-monochrome straight from the camera


 You can barely see anything through a dedicated infrared filter as it cuts out almost all the visible spectrum. The converted camera loves it though. Here’s another picture using the SFX filter:
Ilford SF-X filter plus B&W conversion in Photoshop
Interestingly, hitting "Auto Colour" does a pretty good job of expanding the tones. That's all I did to the picture above, followed by doing the bog-standard "Mode" conversion to black and white- not even bothering to tweak the response. there's a lot more potential for making high quality images but for the moment I'm still just a kid with a new toy...

Infra-red photography is interesting as the camera sees totally differently. Foliage reflects a lot of IR so it records as light, almost white. Blue skies and water have very little IR so they record as very dark. An overcast sky is ‘warmer’ as the clouds reflect quite a bit of IR. After a while you get better at predicting what the images will look like but it’s not really for Zone System previsualisation techniques!  It’s good fun and has quite a bit of potential though.

Finally here are a couple more made with a piece of Kodak Wratten No. 29 (deep red) gel filter:

The curious dual sky colour is how the camera rendered it. 

Quarr Abbey, Isle of Wight 2018.

I find the orange/green colours a bit much. - Here's a B&W conversion.
I'm not sure what caused this curious blur/streaking effect but it may be over exposure or over heating of the sensor
I've got several images which show this blurring effect. It seems to be on the pictures where the light and ambient temperature were very high. My best guess is without the protective filter too much heat (and therefore infrared) overloaded the sensor. - I'll do more experiments to find the cause but it's not necessarily a defect: - just an alternative outcome.  See the deliberately exaggerated pixellation below. Who says you can't have 'happy accidents' with digital?

Round the Island Yacht Race, July 2018

Friday 15 June 2018

World Wet Plate Day 2018.... Was it just me?

World Wet Plate Day is an opportunity for the global community of wet plate artists to celebrate their medium by making and sharing pictures made on a specific date: usually the first Saturday in May.

It's a good way to kickstart some springtime activity for those of us who tend to make fewer plates in the winter.  Last Year Annie Haggarty 'christened' her new studio/darkroom by making some plates for WPD  and this year I decided it was time I made a properly big plate: the full 12"x15".

I had some glass cut to size, I'd made the helper tray and silver sensitising tank, and amassed the necessary £300-worth(!)  of silver nitrate needed, I just needed an impetus to get started. Wet Plate Day is also the start of the bank holiday weekend in the UK so I had some free time.

12"x15" is quite an increase in scale from whole plate or 10"x8" . It's roughly the same as A3 so it's more than twice as big.  You use a LOT of collodion on each pour - even if you don't drip any from the edges and the weight and sheer unwieldy size makes it quite an effort.  Pouring isn't as difficult as might be expected. The bigger puddle flows more controllably than on a small plate somehow but you do need to avoid letting it spill over the edges or you lose a lot very quickly.  The collodion takes a little longer to 'set up' - that is to become slightly tacky so it doesn't come off in the silver- probably because there's a lot of ether about (ventilation is very important!)

I made some test exposures recently using one of the oak trees in the garden.  I love the little micro-environments around the bases; full of ferns, ivy and grasses and the super detail of a big plate is ideal to render this stuff. Here's my first 12"x15" Ambrotype:
this will do for a first attempt at an ultra-large format ambrotype.
My 12x15" camera has a 520mm Berthiot Paris 'Special Aviation' lens which is pretty fast (f/6.3) and very crisp as you'd expect from a reconnaissance lens. -It's no swirly romantic Petzval!  It has a character all of its own and is very rewarding and inspiring to use.  Now to upload it to the World Wet Plate Day site...

.. Except it doesn't seem to exist for 2018!
2017 and previous years are all there at http://www.wetplateday.org but nothing, not even a date for this year. Shame.  Never mind, it made me get out and make the work which is the important part.

Update: 28th May 2018: The Wet Plate Day site now says "currently moving servers" and there's some stuff on social media  about next year: May 4th 2019 so I guess this year was a bit of a hiatus for the organisers. Hopefully next year it will be back in full -(and on a proper website as I don't succumb to the tyranny of F**ebook or similar stuff ;-)

Some final thoughts on ULF (ultra large format) collodion:
It IS worth the aggravation and expense: A really big ambrotype is an astonishing thing, even when made by my inexpert hands. Exposure tests can be made with smaller plates (once you've poured a big plate, smaller ones suddenly seem much easier !).  Glass cleanliness and good collodion are even more important, as old collodion can easily shrink by 2.5%.  -which doesn't sound much until you realise that across 15 inches it means a split of more than 9mm.

I made more 12x15 plates over the bank holiday weekend. There will be a series on the trees and the things growing on and around them later this summer. - here are a few samples:


Saturday 28 April 2018

UCA collodion sessions for 2018. Best Hats Yet!

I've just finished the third day of workshop/demos for UCA students. We made some great plates, thanks to a wonderful new (actually 100 year old) portrait lens, good weather and most importantly some creative, enthusiastic and inventive people who really got into the spirit of things. Thanks to everyone for making these: a real team effort as always.

The first day was for year 2 BA Photography. Here are the plates. Mostly half-plate ambrotypes:


Sadly Emily's last plate, a whole plate tintype fell victim to the old collodion shrinking as it dried. The odd thing was that we made a couple of other whole plates and they didn't peel. Maybe too long 'setting up' between the pour and the silver nitrate? I'm not sure but it's a reminder of how fickle this process can be. The learning curve is endless.


The next session was for MFA students. Corinne brought some great dressing up stuff and everyone made a real effort to transform themselves for the camera:


The set-up in the finishing room: Note the head brace to help the sitter keep still. (photo: Hayden Wilde)


Corinne has a go at pouring a plate. I was impressed with everyone's skill at this tricky operation. (photo: Hayden Wilde)


The hat needed a little adjustment! (photo: Hayden Wilde) 

Su Ji posing for the 12"x15" plate camera. Note how the orange feathers record as black in the Ambrotype. (photo: Hayden Wilde)


Hayden was the super-assistant for these shoots. We made this whole plate tintype as a small token of thanks.

The following day, the remainder of the MFA people came for their session. Again, some great hats, inventive use of props and original styling and poses:


The mirror Danielle is holding has solarised: - a beautiful effect.


Thanks to everyone who took part. Looking at the smiles in all the production shots it's clear you all enjoyed it as much as I did.

Thanks once again to Hayden. His hard work and super-efficiency were very much appreciated.