Sunday, 18 December 2016

Happy Christmas!

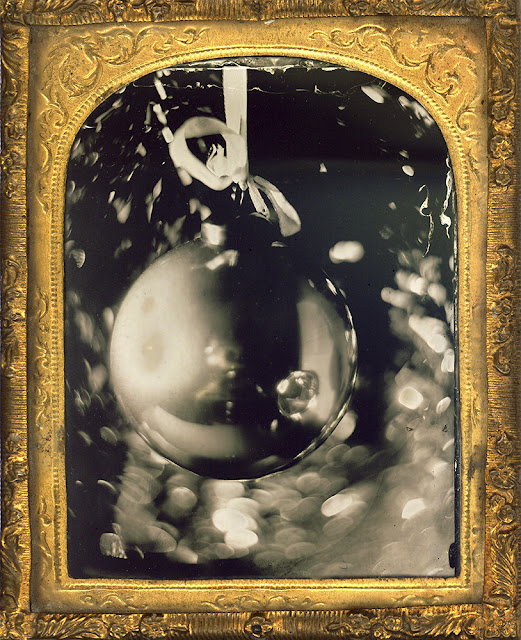
A very Happy Christmas to everyone on the Alternative and Historic Process User's Group!


Technical  notes: The image is a quarter-plate tintype (collodion on black trophy aluminium) which I set up specially. The hardest part was getting a reflection of the camera in the bauble: I had a hard time finding a good, truly mirror-reflective one. The exposure was 4 minutes (240 seconds) at f/4. - A combination of macro focus distance and low-power spot lights gave me little alternative!  The frame is scanned from a ninth-plate Daguerreotype in my collection (more about that another time)
It was interesting to do but hard work!  

 I hope you enjoy it and I look forward to more historic and alternative work next year.
Peter.

Sunday, 16 October 2016

A Mousetrap camera.


When conducting his early experiments, William Henry Fox Talbot used a number of very simple cameras,  little wooden boxes which he positioned around his home, causing his wife to nickname them his “mousetraps”. 
Talbot started by using the lenses he had to hand -generally from microscope optics. These typically have tiny coverage and short focal lengths, hence the small boxes. 
This one was made as an experiment after I was given a tiny lens, possibly from a microscope or something similar.. The focal length is about 33mm and the maximum aperture is approx. 16mm  which equates to f/2. 
The "Nipper" mousetrap camera. about 3 inches (8cm) high.

A basic box was made up from plywood with the lens simply screwed into a hole in the wood. The back is hinged with a hook catch to hold it shut.  More pieces of plywood inside make a frame to hold the plate / film / paper in the right position for an infinity focus. Such tiny lenses are hard to focus accurately but by trial and error with a piece of ground glass and a magnifier the frame was sanded down until it was the right depth. Closer distances could be focussed by the addition of card spacers.  
Loading in the darkroom. The paper neg here is a little under 60mm x 70mm.
Made for experiments with early processes such as Talbot’s salted paper Calotype it’s about as simple as a camera can be and makes a very beautiful image on tiny plates. The whole camera is about 3 inches (8cm) high.  It has a tripod bush but no shutter or viewfinder and no removable plate holder. The camera is loaded and unloaded in the darkroom for each shot.

Here are some preliminary tests using little bits of resin coated print paper:

Like NiĆ©pce (and because it was raining) I started with the view from my window. You can see the reflection of the tripod. 
Note how the centre of the image is reasonably sharp but  the distortion rapidly increases towards the edges. All lenses do this, but mostly the camera just uses the 'sweet spot' in the middle. I deliberately made this oversize to explore the effects.

Liss Mill. Opposite my house it's a handy test subject.
Without a viewfinder, aiming the camera is a bit hit and miss. I could set it up with ground glass in place but then I'd need to return the camera to the darkroom for loading. A quick release tripod plate would be a solution. A better one would be to have made the camera take film holders ('dark slides') but I wanted to keep things simple, primitive and true to the Fox Talbot original.

The lens covers a very wide angle but as only the centre is sharp framing is more critical than you'd expect. In this picture the building is reasonably sharp (you can count the bricks in the central area) because it was well centred..
.


... This time however it's framed a little closer to the top and the resulting distortion is quite dramatic!  I don't see this kind of thing as a defect of the lens, more revealing aspects of its character.

Another aspect I hadn't worried about was the speed of the lens. At f/2 it will be good for very slow materials like salted paper calotypes but if anything it's a bit too bright for paper negs. 
Exposure times on a dull rainy day were around 1/8th second or so. I was using a Sinar shutter on these tests for accuracy but I want to use just a lens cap to control the exposure. a much smaller aperture, say f/32 would mean long exposures of several seconds or more. - easy to control without a mechanical shutter. I need to make a 'Waterhouse Stop': a piece of thin metal with an aperture hole cut in it. As the f/ stop number is a fraction of the focal length, f/32 for this lens will be about 1mm in diameter.  I'll get lots of depth of field but probably not much reduction in the distortion. We shall see..Finally, as the weather deteriorated and I decided to pack up for the day I noticed the panels of the back door. This is just opposite the darkroom and I've passed it hundreds of times. Today though, with early pioneer photography on my mind I noticed it bore a slight resemblance to Talbot's famous Latticed Window. Time for a little homage...


My back door. Almost entirely unlike:
...Talbot's Latticed Window at Lacock, 1835.

I made the camera as the first step in experimenting with things like Calotypes and other very simple in-camera processes. I've learned a few things which will go into future projects and I've felt about 8 years old, enjoying the excitement of it all. Lenses are miraculous things!

[Finally if you're wondering why the mousetrap camera is named "the Nipper" ask your grandparents! :-)

Wednesday, 31 August 2016

Cyanotypes at Andinet in Ethiopia.

During a three week trip to Ethiopia this summer where I was teaching and decorating at Andinet School in Azezo I got the chance to make Cyanotypes with a group of 26 children from grades 1-3. With ages ranging from 6-25 and very basic english from most of them it was a challenge to get going but once they were able to see the process happening everything seemed to click. The paper I had pre-prepared at home in sheets of 6x4 and once there I got them to take it in turns of groups of two. I first got the children to explore the local fauna and flora of the school to find a suitable leaf or flower to use. A very basic set up perched on the edge of our classroom outside we were lucky to have such a bright sunshine on this particular day during their monsoon season. These are two test cyanotypes I made myself before starting with the children.


By the end of the session I feel as though the children; particularly those older were really starting to grasp the process and the importance of the sun within it, the whole morning was a complete success with compliments from the school director and an audience watching when we finished. Lots of smiley faces, dropped jaws and beautiful Prussian blue prints!


-Lucy J.

Monday, 22 August 2016

Wet Plate Party

[My apologies to those who would be forgiven for thinking this blog is becoming "The Wet-Plate Weekly". - other processes are available and will be written up soon- I promise!- P ]

Quite a few people have shown an interest in the wet collodion sessions I've run at UCA and a staff day is (still) promised. I thought it would be fun to have a bit of a party for some of the people on this blog group and others, mainly to socialise but also to provide me with some subjects. I also want to do a series of portraits of photographers and this seemed a good place to start.
As it turned out the weather wasn't special so the planned barbecue was off and we worked inside, using the (highly variable!) light from the French windows. We used my Watson whole plate camera and an interesting lens: an Aldis Epidiascope (projector) lens of 35cm and f/4. It covers whole plates easily with no obvious distortion (I've done quite a lot of swirly bokeh stuff recently and wanted a change) and it's a nice portrait lens: softish and low in contrast. It worked well with the available light, though some aperture control would be an improvement. I'll cut a slot in the barrel and make some Waterhouse stops for it when I have time.

Here's a test shot of Annie (Sorry Annie, we should have gone back and done another proper one of you). Marred by some dodgy glass-cleaning on my part. - At least that's what I think the problem was: A big section peeled off while the plate was drying. I had a new micro-fibre cloth I was using to clean the plates with and I'm wondering if that left some kind of residue. It may just have been carelessness on my part.


This one is my favourite: Martin Pover looking very distinguished - and possibly just a tiny bit like David Bowie? - a very 19th-century feel to the light and the lens quality. Just daylight and a small reflector to fill in the shadows. The exposure time was around 20 seconds at f/4 with bright but cloudy weather outside. (this equates to around ISO 0.2)


Next we had the undoubted star of the day.  Ruby is Annie Mitchell's daughter and the assembled photographers all agreed she looked just right for a Julia Margaret Cameron cherub!  One wild flower headband later she was ready to pose, sitting wonderfully still for 30 seconds. - Her eyes have moved a bit but to be fair we didn't tell her to stare at a single spot. Thank you, Ruby for being such a great model.

Below:  Annie and Ruby together. This was harder to keep still, despite Debra's 'watch the birdie' skills: She played cartoons on her 'phone to keep Ruby's attention in the same spot. I think I over-developed the plate a little I'm afraid.


Above:  Silke Dettmers. I shouldn't keep apologising for the technical defects I know, but I wish I'd have done a better exposure and poured the developer more evenly. I think I'm going to sit and practice with a dummy plate until I can do a perfect (or at least adequate) pour. The ideal is just enough liquid to cover the surface, spread evenly and swiftly and then kept on the plate, not dripping off the edges for the 15 seconds or so it takes to develop.

Lastly, Debra-Lorraine was good enough to bring her camera with her as requested. The idea of photographing fellow photographers with their cameras got a bit lost during all the excitement but the day was primarily for fun which I think we all had. I was impressed by Debra's keenness to pour plates. - most people are a bit reticent because it looks difficult. Several of the plates here were prepared by her.

Thanks to everyone who came. Special thanks to my lovely Catherine for feeding and watering us all and apologies to Algernon for his having to spend the day shut out from proceedings.
I'm delighted that everyone seems to have enjoyed themselves as much as I did. We must do this again!

                                                                                                                                             Peter.

Thursday, 18 August 2016

Selfie stick? - no, that's a Black & Decker Workmate.

As Large As Life.


Some people will be familiar  with "The Behemoth" - my home-built 20"x24" mammoth plate camera which I've demonstrated at a few workshops. The current spell of good weather has meant I've finally had the time and conditions to have a bit more of a play with it.
The lens is a 21" (533mm) f/10 Taylor Hobson Cooke from a process camera with enormous coverage. The bellows extend to about 32 inches (812mm) which allows a good range of focus but this means it won't focus closer than about 60 inches (1.5m). This is close enough for most things, especially at this scale but it would be interesting to be able to photograph things at life-size.

A bit of calculating (the principal lens formula: 1/V+1/U = 1/f is so useful in camera building!) shows that for a 21 inch lens I needed a bellows length (U) of 42 inches. - Actually for 1:1 magnification it's easy- just double the focal length).  As the bellows wouldn't stretch further I built the Behemoth Close-Up Accessory - a 10 inch deep wooden box which clips to the back of the camera to extend it.

So to test it: The idea was always to make life-size head and shoulders portraits so I started with a self -portrait. - Always one to make things as difficult as possible for myself!
The depth of focus is tiny at f/10: - maybe an inch at best. I used by head clamp/rest to make my position the same every time and set up a rod on a stand with a paper flag as close to where my eye would be as I could. Focusing on this was just about possible.

The full set up:B&D Workmate bench is better than a tripod...
I used ordinary R/C enlarging paper as the sensitive material. This is around ISO 3 so I set up outside in open shade where there was a decent amount of light. The camera isn't very heavy -at least for its size(!) and will sit on a tripod. However, for this I used a Black & Decker 'Workmate' bench. The advantage is that the camera can be slid back and forth a few inches on the bench and locked in place much more quickly and easily than with a tripod.  With close up work like this it's a lot easier to set the focus and move the camera.
The two plate cameras behind me are just to make an interesting background. The round mirror by my feet is adding a bit of reflected highlight into my eyes. The two sticks to my right are my focusing target and to operate the card flap over the lens I used as a shutter. (This idea I got from Sally Mann: It works beautifully!)  Also visible is the metronome used for timing the exposures. 45 seconds at f/32 was the final exposure.

Here's my final picture for the day: I can't say it's particularly great: The chair I used made me 'slump' too far back and the camera should have been lower. My grumpy expression is mainly due to trying to keep still and with my eyes open for a long time on a bright day. Anyhow, it was meant as a test of technique and feasibility more than a piece of artistic expression.
Life-size self portrait. PR. August 2016
The paper negs were processed in the darkroom and then re-photographed and tonally inverted digitally. - I haven't had time to go back and contact print them yet. I'm therefore guessing a bit what constitutes a good paper neg: I just worked on getting detail in both ends of the scale (it's a fixed-grade 2). More on this when I've done some more work on it..

Thursday, 23 June 2016

The Story of an Albumen Print


I found this print in a charity shop recently. It was sealed in a clear bag and under a mount but it was obviously a real photograph and not a reproduction, looking very much like an albumen print. At £2 it wasn’t a difficult decision to buy it  (This is why my house is packed full of old stuff!)

Luckily this print had been mounted by a framer who knew a bit about old prints. It wasn’t dry mounted or glued to the mount but just held in place with a couple of acid-free paper hinges. The mount hinged open so it could easily be removed without damage. Ideal.
When originally made, the print had been pasted to a piece of thin card. This is quite common as the paper used is very thin and fragile.  Albumen prints are made by coating fine drawing paper in albumen (egg white) before sensitising with sliver nitrate. The prints have a slight satin sheen to them, subtle tonal gradation and very fine detail. The highlights are frequently yellowed, as the egg proteins break down over time.


The faint pencilled caption says “Palais de Tuileries” but no more information. Time for some research…
The palace no longer exists. It used to stand at the western end of the Louvre courtyard- the side now open to the Tuileries garden. It was completed in the 1860s but burned down in the Paris Commune riots of 1871.
This photograph  must therefore have  been made between 1860 or so and 1871. The albumen print would have been made from a collodion negative as the ‘collodion period’ runs from 1851 to about 1874 (“dry plates” were invented in 1871 and most photographers abandoned collodion within a few years)


A Google image search quickly yields some identical pictures. Even if this was a well-used viewpoint the pattern of the open and closed windows and blinds wouldn’t be the same. There are prints in the collections of the Musee McCord, The Biblioteque Nationale and the Metropolitan Museum of Art. These fine bodies list their collections online and all list the photographer as Achille Quinet…


Sarah Kennel in the Encyclopaedia of 19th Century Photography has this to say about Quinet:
Achille LĆ©on Quinet (1831–1900)… was a successful photographer who operated a studio at 320 rue St HonorĆ©, Paris from about 1869 to 1879. Although Quinet made photographs of the moments and architecture of Paris as well as a series of views of Italy, he is best known for his landscape… Most of Quinet’s work is housed at the BibliothĆØque Nationale, Paris, where he deposited his Etudes at the DepĆ“t LĆ©gal in 1868, 1875, and 1877.
So..
It would appear that what I have here is a photograph from about 1865-1871 (so around 150 years old) and made by a kind of precursor to one of my heroes: Eugene Atget. Quinet, like Atget made photographs of architectural features of Paris as well as “documents for artists”, and (unknowingly in this case) recorded a part of Paris which would soon be destroyed. The picture is technically very well made, but not as lyrical as Atget would have made it. It’s more of a record than an artwork.
The detail is very fine. This is almost certainly a contact print from a negative of around 8 x 10 inches. With a magnifier it’s possible to read the numbers on the clock, which has only one hand…


.. hang on.. This is a collodion image made on a hazy day. The lens would have been stopped down for best sharpness (and a slower “rectilinear” type for architecture) so the exposure time was probably several minutes.  That’s why there’s no minute hand on the clock: It moved during the exposure and was too blurred to register.
[I recently found another example in a photograph by Julia Margaret Cameron. Taken over a couple of minutes just before midday it seems: ]
detail from Julia Margaret Cameron image. See the blurred but visible minute hand.

One last little gem: The back of the print has a little pencil drawing on it. - I’ve no clues as to who this woman might be so she will have to remain a mystery. - like how this piece of 150 year old French photography ended up in a charity shop in Hampshire. 
I treasure things like this, and I love living in a world where it’s easy to find the additional information which gives them a life and a story.
Who was this? Why was this drawing on the back of the print? This part will remain a mystery...


UPDATE: September 2017:
Never say never!  - I've just bought a cartes de visite album with a good number of 'celebrity' cartes in it, mainly European royalty. In among them is this one: "Eugenie, Empress of France, wife of Napoleon III"
The carte is reversed (I've flipped it back here for comparison) so maybe the image was traced from a similar print but it's definitely the same picture, so we do know who she was after all.  Blimey! - I'm becoming a proper collector...
... or not.  Mystery solved. Carte de Visite of Eugenie, Empress of France.

Thursday, 28 April 2016

I Wear polarisation: Cyanotypes on cloth in a new exhibition.

Lauren Isaacs and Veronica Ward-Horner have created a multimedia piece as part of the INTERMEDIA show staged by UCA Arts & Media at Farnham.
Seven dresses have been treated with cyanotype chemistry and then printed with individually made imagery to reflect their role.

"The seven dresses represent respectively; the girlhood rejection of femininity sumptuous protest of the grotesque feminine, duality of the virgin slut, the hollow superficial female ego, the gift of patriarchy and security, the profit of "girl power" and Mrs. Obedient subordinate. The film projected in the centre uses clips from TV and film which mirror and compliment aspects of each of these dresses"


As well as being a complex and thought-provoking artwork the techniques involved should be interesting to everyone who works in this area.  Do go along if you can: Admission is free.


James Hockey Gallery
UCA Farnham Campus
Falkner Road 
Farnham 
Surrey 
GU9 7DS


Tuesday 26 April – Thursday 5 May 2016
Monday to Friday 10am - 5pm
Saturday 10am - 4pm
Closed Sunday 


Wednesday, 6 April 2016

Starting Collodion 5


The next day, Sunday.

What a great day I had on Saturday.  We spent a lot of the day in the darkroom discussing the process.  I ended the day feeling inspired and confident to have a go on my own and I fully intended that Sunday would be spent practicing.  BUT, Saturday night brought with it a light headed kind of tiredness that was unpleasant, Sunday morning I got up with an awful headache, I'm pretty sure that spending too much time in the fume filled darkroom had caused this, I even missed the uni trip to London on Monday.  Lesson learned; ventilation must be considered for next time.

I think it is important to get the balance between fear and respect right when dealing with these chemicals.  They can be very nasty but with common sense, vigilance and respect this process is going to be a real joy.

Starting Collodion 4


First Plate!
Saturday.

Peter offered to come to my house to help see me through the first day, this was very generous of him and made the most enormous difference to my progress - Thanks Peter.

David Summerill also came along and all of the images are taken by him - Thanks Dave.

The glass plates need to be cut to size with the glass cutter and a ruler then the rough edges should be smoothed with the diamond file, rinsed, dried then thoroughly cleaned using the plate cleaner and cotton wool pad, then polished until completely spotless with the cloth.  Using a Q tip I painted a thin line of albumen solution around the edges of the plate.
The plate is now ready to be used.

Before I could pour the plate, the camera had to be set up, focus checked and aperture etc chosen.  This all has to be done prior to pouring the plate as the image has to be taken and the plate developed whilst the collodion is still wet ( wet plate process)
I poured the collodion on to the plate.  The idea is to get a smooth, even coating on the plate.  Mine was a bit lumpy, wrinkled and didn't really cover the whole plate.  Oh well, have to start somewhere!
Once the collodion has been poured, it needs to form a skin but NOT dry, to check for this I touched the corner of the plate gently with my finger tip to see if it left an imprint.
Now into the silver bath for 3 minutes
When the plate goes into the silver bath it's time to turn out the light and set the timer for 3 minutes.  Red safelight is now all I can use.
After the 3 minutes the plate was lifted from the silver bath, the back wiped with kitchen roll to get as much excess silver off as possible and loaded into the plate holder.
I took the plate out to the camera and made my image.
The plate was then brought back to the darkroom, removed from the holder and developed.  This was done by quickly and carefully pouring a small amount of developer across the plate.  This is by far the trickiest part (for me) the dev. must cover the plate, mustn't sit still on the plate, shouldn't be poured in one spot, only use the correct amount etc. The developer is stopped by pouring distilled water across the plate.  Once it's developed it needs rinsing under the tap, I found that adjusting the flow of water gradually whilst rinsing worked well and reduced the risk of blasting the film from the glass.  The plan is to rinse the plate until you can no longer see a greasy looking residue across the image.
The it was the best bit, fixing the plate.  This washes away all the undeveloped silver and leaves behind the image (a little like developing in the darkroom).

It was very exciting to see the image appear. I love the way the plate is both negative and positive.
The rest of the day was spent experimenting like this, only stopping for a bacon sandwich and tea!
Touching the plate to see if it's ready for the silver bath.

Placing the plate in the fixer (Sodium Thiosulphate)


Starting Collodion 3


Getting the space ready.

I have a large utility room attached to the garage, it has a sink and good amount of work space.  As it opens directly into the garden, getting to and from the camera quickly won't be a problem.  The room is not attached to the house so the fumes will be confined to one space.  The room has 2 large windows which I covered with some black out curtain liner (£5 per metre form amazon).  Although this was cheap it is very effective at blocking the light.  I fixed it to the window using Duck Tape.
I have a plug in red safe light in the dark room so I just used this, it seems to be sufficient.

The Silver Bath has been filled with the newly mixed solution but before it can be used it needs to be 'excited' (insert pun here!)
This is done by pouring collodion on to a plate and lowering it in to the Silver Bath there it must stay overnight.  This releases iodides in to the bath.

This was all done on Friday so that I could begin on Saturday - it's sooo exciting!
Setting up, nearly ready!


Starting Collodion 2

Camera.
I already have a 5x4 MPP camera that I picked up on eBay last year.  It was a bit mouldy and tatty but I gave it a bath and let it air for a few weeks and it seems to be fine.  It came with a schneider 135 lens which also seems ok.  I'm sure I'll 'need' a collection of old brass lenses soon, but for now this will have to suffice!

Silver bath.
At around £70 online I decided to have a go at making my own.  I ordered A4 sheets of 3mm black perspex and a small bottle of Tensol 12 glue. All for under £30.  Using (or sweet talking someone else to) 'Illustrator', I got the design drawn up ready to take to the laser cutter at UCA, more begging was involved to get help with using the cutter but eventually I came home with an airfix style kit ready to glue together. That glue honks!  The gluing was not as easy as I had hoped, to get the box watertight took 2 days.  I was reasonably pleased with the outcome but not convinced that it was up to scratch so I just bought 1 from John Brewer.  I know it's a bit of a cop out but at least I can be sure it won't leak! I've kept the home made 1 for another day.

Chemicals.
I ordered the following from John Brewer and spend around £135

Silver Nitrate Crystals
Positive Collodion (ready mixed)
Positive Developer (concentrated)
Plate Cleaner

Fixer (Sodium Thiosulphate) Amazon or Ebay under £10

Distilled Water £3 for 5lt  (I bought 2)

IDA (Industrial Denatured Alcohol) used for mixing and preparing a variety of things.  This can only be bought with a license.  This is free and fairly simple to obtain on line.  3 litres cost about £30.

Albumen (for edging the plates) This is just egg white mixed with water.

£251 excluding the camera so far!  The rest of the list of items can be bought, begged, borrowed or made (not stollen though!)

The list was given to me by Peter Renn and has been put together from experience.  He was kind enough to mark the things that were necessary and those that may just make things easier.  These are some of the things I've collected.

Safety goggles £6
Lab jacket (silver nitrate stains everything it touches) £17
Protective rubber gloves £4 for a box of 50
Hydrometer ( beer making )  £3.50
Thermometer (beer making) £3.50
Plate drying rack, with a drip tray £10 Amazon, it's a bit big so may find a better one in the future.
Plastic funnels £1 for 3 Wilko
Unbleached coffee filters £3 Tesco
Jewellery scales £15 Amazon (you can get cheaper ones but after reading reviews I opted for better quality)
Plastic Bottles £10 for an assortment from amazon, I bought some 500ml and some 100ml but should have bought some 1000ml too.
Digital timer with no light £1 Ikea.
Cotton Wool Pads
Cotton Buds
Kitchen Roll
Jugs/Glass beakers
Clean Cloth for cleaning plates, I have got some old muslin and some put linen cloth.
Developing Trays (New black baking trays work)

Glass Plate Holder for the camera. Peter converted a film holder for me (quarter plate size). I also bought a plate holder for 5 x 4 plates £20 form ebay.
Glass plates.  Picture glass is good
Glass Cutter £10 eBay
Diamond Whet Stone for smoothing the edges of the cut glass.

Sounds off putting I know but most of this stuff only needs getting once!


Starting Collodion

I'm in my second year of a 3 year BA(Hons) Degree.  It's that time in the course where we need to begin thinking about what we want to do when we grow up. This is what I want to do.

About a year ago, as part of the course, I attended a collodion wet plate workshop. As is my way I got very enthusiastic and excited about this new (to me) form of picture making.  The desire to use wet plate collodion never left and this year, as I began to feel the precious time at uni slipping away I decided I should bite the bullet and learn this new (or old) skill.
As my tutor - Peter Renn had offered to help and support me I asked him where I should start.  He gave me a check list of 'stuff' to get.

And so began the adventure!

Thursday, 10 March 2016

2016 Collodion workshops at UCA Farnham

This year's workshops were a great success: The list was 100% oversubscribed again so we we ran two days. We were working with half plate (8 x 6.5 inch) glass and the Watson studio camera I've recently acquired: - It has a quick-slide ground glass which makes it easy to check focus and quickly insert the plate holder. No doubt a very useful system in a busy studio in the 1860s.  The time it takes to set everything up and prepare plates means that on these days we make simple, straightforward portraits of each other. The process is magical enough to create wonderful images while everyone is getting to grips with the techniques involved.
Everyone hard at work cleaning glass plates ready to make ambrotypes (collodion on glass)
Here are the results from Monday:


Quite a lot of faults on this plate: Peeling collodion, unevenly applied developer
and over exposed/developed areas which have solarised. - It all looks great though!
Hayden was Champion Plate Pourer for Monday. He both poured this plate and
appeared in it. Credit must go to whoever  framed the shot up. It looks terrific.
One of the joys of this process is the 'happy accidents'. The solarised exposure
and swirly pour marks  make this really interesting.


I love it when people add incongruous elements to the picture.
Madi made this surreal image.


A huge vote of thanks must go to Annie Haggarty who volunteered to help and was tireless and indispensable in a multitude of roles, most notably as the "Kitchen Roll Fairy". - Always there when needed and made things run so much more smoothly. Thanks Annie!


On Wednesday, due (once again) to popular demand we ran a second workshop. Despite the weather being horrible outside we managed some good exposures using nothing but the daylight coming through the window.  Later in the day, we started to supplement the daylight with a UV -enhanced flashgun. This worked so well that I  clearly need to do some more experiments with UV-flash. I'll report back on these pages when I have made some tests.


Agnes was brave enough to be first subject. Once everyone sees how good you look in a
collodion portrait they all want to do it, but you have to have faith to be the first.

Natalie is on the DFSA course and has an interest in the process.
She joined us for the day.  Welcome!

Lauren went for the surreal option- and it really works! - inspired...


With John, we followed Julia Margaret Cameron's practice of shrouding
his shoulders in black velvet to concentrate on his head. The result
speaks for itself.

Using the UV-enhanced flashgun evened up the light and compensated for the falling light levels.

The tone shift caused by collodion's spectral sensitivity  (it doesn't respond to the red
end of the spectrum but does record well into the ultraviolet) transforms some portraits
more than others. Paula looks very different!

It's tempting to go for the weird and wonderful - and we've got some amazing results
here, but simple, straight portraits can also be very powerful.
This plate of Ashleigh is a beautiful example.

Again, thanks to Annie for the fetching, carrying and general facilitating - and especially the tea and Creme Egg! :-)  Well done to everyone who attended on both days. These great pictures are the result of  team efforts: Everyone contributed by cleaning glass, pouring plates, operating the camera, holding reflectors and of course sitting very, very still.